How to Control the Volume of Individual Apps on Windows

Most of us will have all kinds of audio pumping out through our Windows PC speakers (or headphones)—but you don’t necessarily want your background lo-fi chill-out mixes at the same volume level as the video calls, or your notification sounds playing quite as loudly as the podcasts you’re listening to.
That’s where individual app volume control comes in. Right out of the box, Windows has its own built-in options for making your own volume mix on your desktop or laptop. There are also third-party tools you can turn to, if the controls available in Windows aren’t quite what you’re looking for.
If you use macOS as well as Windows, you can control individual app volumes on Apple’s desktop operating system too—we’ve written about that here.
Controlling volume levels in Windows

Volume slider options in Windows.
Credit: Lifehacker
You’ve got a few choices when it comes to controlling the overall volume level in Windows: You can click on the volume icon on the far right-hand side of the taskbar and adjust the slider that pops up, or if you’ve got function keys you can hit F6 for volume down, F7 for volume up, and F5 for mute.
Plenty of keyboards come with dedicated volume keys as well, so you might be able to make use of those. Then of course you’ve got the volume controls on your speakers, your monitor, or your headphones—these physical dials can sometimes be the easiest and quickest way to turn down or turn up everything at once.
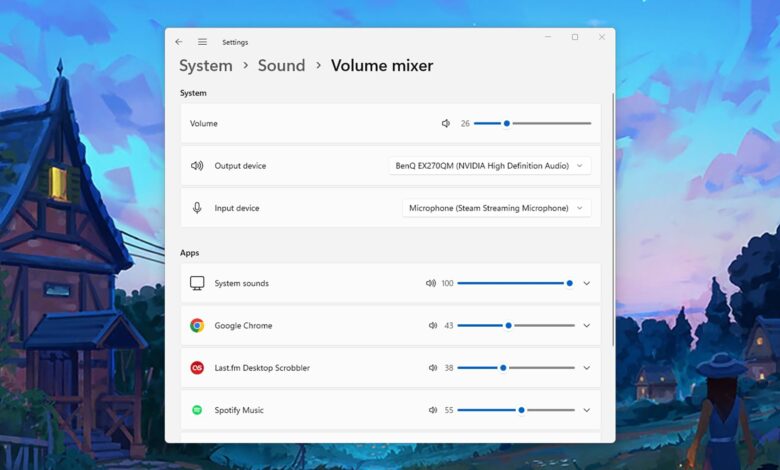
When it comes to controlling the volume of apps separately, you need to right-click on the volume icon on the taskbar, then choose Open volume mixer (you can get to this from System > Sound in Settings as well). You’ll see volume sliders for each app you’ve currently got open, which you can adjust as needed. Click Reset to undo your changes and go back to the default levels.
You can even change which input and output device each program is using, by clicking on the little arrows to the right of each app name. You could have your music playing through your headphones, perhaps, while leaving system notifications and other audio to go through the speakers built into your monitor.
If you’ve got a hankering for the old Windows 10 volume mixer, it’s still there in Windows 11 at the time of writing—you might prefer it if you’ve just upgraded. Search for “control panel” from the Start menu, launch it, then click Hardware and Sound and Adjust system volume to bring up the sliders.
Controlling volume levels with third-party apps

Volume slider options in EarTrumpet.
Credit: Lifehacker
With Windows having its own built-in options for controlling volume levels, there’s not so much of a need for third-party tools, but there are some out there worth mentioning. One is EarTrumpet, which you can download and use for free: It simply gives you individual volume sliders for every app that’s running.
Once the utility is installed, you can click on its icon in the Notification Center (in the bottom right corner), to bring up the sliders. Right-click to get a few options and settings: You’re able to adjust the volume levels from all of your connected audio outputs, as well as set up keyboard and mouse shortcuts for EarTrumpet if you need them.
Then there’s another free app called Sound Lock. It’s not quite the same in terms of functionality as EarTrumpet and the built-in Windows options, but it’s along similar lines, and you might want to consider installing it if you need more control over volume levels—especially when it comes to a maximum volume.
You can’t control the volume by app, but you can control it based on a channel (like stereo or 5.1), and you can control it based on an output device. If you don’t want your external speakers going above a certain volume, for example, or need your headphones to be quieter than your speakers, Sound Lock can help.
It’s also worth double-checking the software that comes with your computer, monitor, headphones, or speakers (or that’s available as a download, if it’s not already installed). Quite often, especially with more expensive headphones, you’ll get custom utilities for controlling the audio mix of the output.


